
This rental property has had unresolved issues for many years.
In the top-floor front bedroom, symptoms manifest, at a distance of a metre or so from the redundant chimney breast. In the top-floor rear bedroom, they appear on the underside of the boxed-in section directly beneath a chimney stack which has had the breast removed from underneath. At both of these locations, water-ingress still occurs intermittently, i.e. not directly coinciding with rainfall. Despite multiple attempts, ranging from modest repairs to the complete re-roofing of the property, the letting agent via the introduction of various contractors has failed to remedy the problem. The incorrect diagnosis has resulted in much unnecessary work.
Following a recommendation and introduction, Buildings Pathologist Simon James Lewis, Neighbourhood Construction CIC, has been engaged to undertake forensic investigations to ascertain the root cause of the problems. Previously no consideration has been afforded for independent diagnosis, only the limited time, freely applied, by contractors speculating for a contract.
During an initial site investigation on Wednesday 23rd January 2019, it was agreed that water-ingress was likely and that a second visit should be scheduled as soon as symptoms returned. Following a week of heavy rain, correspondence was received directly from the occupant on the evening of Friday 8th February 2019, to report water-ingress at two locations. A second visit to the property was scheduled for Sunday 10th February 2019.
Water-ingress had occurred from the ceiling in Bedroom 1, and the boxed-in section beneath the chimney in bedroom 2 consistent with the most recent account reported in early December 2018.
The following report documents observations and symptoms, speculates on the probable causes and makes recommendations for potential solutions.
A number of short, medium and long-term interventions require consideration. Some have already been actioned as part of this buildings forensic investigation.
This report provides the following:
- The observations, symptoms and probable causes.
- Overview of moisture management.
- The potential solutions to mitigate the symptoms.
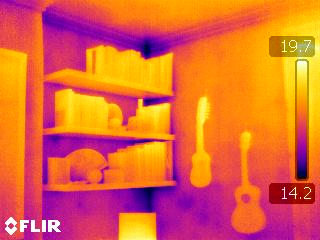
Note – The images produced by the Infrared (IR) thermal imaging camera need careful interpretation. The colours do not represent specific temperatures, it presents a dynamic temperature range, changing according to the spectrum of temperatures visible within each image. Metallic or reflective surfaces may also appear warm when not. This article on the Fluke website covers the methodology for the use of IR cameras during forensic investigations relating to moisture damage.
1. The observations, symptoms and probable causes.
Bedroom 1


a. Loft insulation
During the first visit, the IR camera illustrated cold spots, that coincided with gaps in the loft insulation on inspection above. These were consistent with the slight mould growth on the underside of the ceiling indicative of condensation. The insulation requires refitting with better attention to ensuring a good fit up against the ceiling. The most recent report of water-ingress occurred in Bedroom 2 while not simultaneously occurring in Bedroom 1.
Further observation is required.

b. Passage of water ingress
During the second visit, following a week of persistent and at times heavy rain, the IR camera illustrates a section of evaporative cooling that defines a passage of water from the point of penetration into the room, from the tip of the cold spot, traceable back towards the source at the chimney.

c. Hip tiles
Without illustrating the path of travel across the ceiling, previously it may have been assumed that water was penetrating the roof directly above the leak on the ceiling. This could explain why up on the roof the hip tiles have been replaced at this location.

d. Ingress on the outer surface of the chimney
In the attic void above, underneath the valley, at the source of the evaporative cooling illustrated by the camera, water can be seen on the surface of the brick, on the outside of the chimney breast. Water is entering down the back of the lead flashing.

e. Lead flashing
On the roof, the top edge of the lead flashing slopes back towards the chimney. During this second visit, a hail storm occurred and demonstrated how the local topography funnels wind along the New Cut to produce near horizontal driving rain. The rainwater is driven into this side of the chimney, runs down the face of the brick and is channelled backwards behind the flashing where the sealant has failed.
This detail is poor. Gravity should shed water in the appropriate direction. This detail is reliant on the sealant which with time will ultimately require maintenance. The step has been created by the plywood boarding using to construct the fibreglass valley. This flashing detail should have either been flush or formed with the top sloping away from the brickwork.
A tradition lead flashing detail would not have stepped out catching the rain.

f. Temporary repair
For diagnostics, not repair, Hertalan KS96 sealant was applied. This product is of exceptional durability and high quality. As with all sealants, at some point, maintenance will be required. When shedding water, there is no substitute for gravity.
The leak in bedroom one has now been potential identified and stopped.
Bedroom 2

g. Cold boxing
During the first visit, Wednesday 23rd January 2019, the IR camera illustrated that the boxing in bedroom 2 was extensively cold. This pattern would suggest a lack of appropriately installed insulation and that cold air-ingress may be entering via the chimney void by connecting the boxing to the outside.
It was proposed cutting access to this void to inspect ideally when the symptoms of suspected water-ingress returned.

h. Localised evaporative cooling
On the second visit, Sunday 10th February 2019, the IR camera illustrated a more localised cold spot. A different pattern to that previously, this image shows an area of evaporative cooling concentrated directly underneath the chimney stack.


i. Dry chimney exterior
In the attic void above, water-ingress is not evident at any point along the outer surface of the rear chimney. The passage of water-ingress is different from that of Bedroom one, the front chimney.

j. Chimney void
A hole from the chimney into the attic void was noted. The excessive engineering of the new purlin timbers restricts access to the underside of the valleys for either inspection or maintenance. It was not possible to determine if water ingress was evident inside this chimney.

k. Flaunching and cowls
On the roof and the Flaunching on top of the chimney is evidence of a history of repairs, some of which may now channel water into the Aluminium gas cowls.

l. Valleys pooling water
On the prevailing side of the chimney, the mortar joints have recently been repointed with cement. Also, the newly constructed valley does not provide sufficient fall and is, therefore, holding water. The constant evaporation of water ‘puddling’ in the valley can cause expansion/contraction fatigue, traditionally to lead and most likely also to fibreglass that will ultimately lead to failure.
For now, no evidence of ingress was visible underneath the valley in the roof void below. It may be possible to apply a self-levelling waterproofing material to ‘build-up’ this level, permitting ‘run-off’ to reduce the risks associated with pooling water.

m. Invasive inspections
Below, in Bedroom two, a series of holes were cut into the plasterboard. The location for which were determined by the concentration of evaporative cooling illustrated by the IR camera.
Of note was the discovery of a disk of plasterboard concealed within the void from a previous invasive inspection.

n. Sedimented and saturated brick dust
Inside the boxing, amongst other detritus, such as newspaper articles of their time, a piece of melamine faced chipboard is observed situated underneath the chimney void. Swollen with moisture the chipboard supports a deposit of silted brick dust, sedimented and saturated.
Only with prolonged periods with specific conditions, either persistent, heavy or driving rain will cause saturation and then water-ingress. Such intermittent symptoms lead to difficulties in determining a pattern.

o. Expanding foam filler
For diagnostic not repair, expanding foam filler has been applied using a foam applicator gun, with the objective of determining whether the redundant gas cowls are the source of ingress. Unlike others, this chimney has had the breast removed from the room below. Perhaps the full-length drop of the chimney would have previously provided a greater area in which to defuse water ingress.
Continued observation of this chimney is required. The plasterboard boxing in proximity to the redundant chimney must be removed on both the underside and face. The wet detritus must be removed, air ingress stopped and the area inside allowed to dry before re-boarding. Once dry new plasterboard can be mechanically secured with plasterboard screws to facilitate immediate access if symptoms return. Re-plastering and painting could be delayed until after repeated episodes of persistent driving rain. For now, the foam should be trimmed flush with the cowls and aluminium tape applied over to improve the seal until confirmation has been achieved. If the juncture between cowls and flaunching are (via this methodology) determined to be the source of ingress then the cowls should be removed and the Flaunching made good.
There is no doubt that rainwater ingress is occurring as described above, however, high humidity levels are also evident in other symptoms throughout the property.

p. Laundry
With no access to an outside laundry drying space, it is positive to see the necessity of indoor laundry drying is being undertaken slowly, on a clothes horse, rather than being forced dry on a radiator.
Extracting the moisture would be more advisable, either with a tumble dryer or with the addition of a Single Room, Mechanical Ventilation Heat Recovery (SR-MVHR) extractor unit. The installation of an SR-MVHR into the bathroom, and or the kitchen, would make excellent drying rooms. (see vents below)

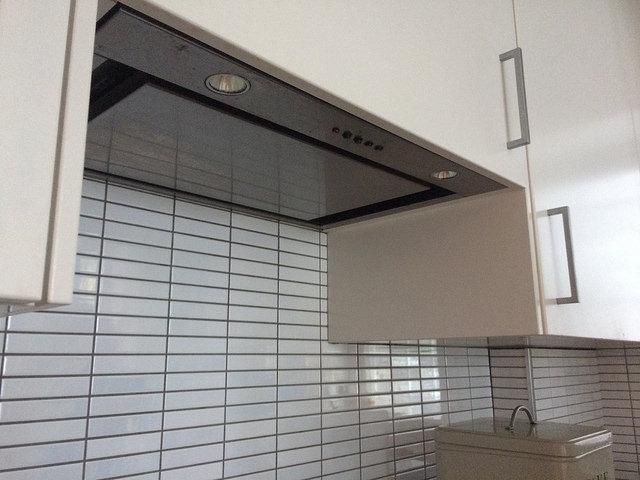
q. Vents – kitchen extractor
The kitchen cooker-hood is a ‘recirculating’ unit. It does not extract air from the room to the outside. Designed to collect airborne grease, it does not remove the moisture produced during cooking or other kitchen activities. The unit should be connected to the outside to extract moisture and fitted with a backdraught shutter to prevent unwanted cold air-ingress when not in operation.
Additionally, or alternatively, the installation of an Envirovent Heatsava SR-MVHR into the kitchen would automatically regulate humidity levels. Addressing other sources of moisture, such as indoor laundry drying, as well as reducing heat loss.


r. Vents – bathroom extractor
The bathroom extractor is underpowered, inappropriately installed and does not provide the appropriate level of air-change required. Furthermore, in the attic void above, the extractor pipe is presented to the back of an air brick. Much of the air extracted may find its way into the attic void, increasing humidity which will lead to infestation and degradation.
A better equivalent extractor, suitable for ceiling installation, would be a decentralised Mechanical Extractor Vent (dMEV). The Envirovent – dMEV would automatically regulate humidity levels and provide appropriate levels of air-change. This unit incorporates a backdraught shutter and would be better located directly above the shower cubicle. It also needs to be appropriately installed via connected to a louvred vent cover, exiting the building without being impeded by the air-brick.
Alternatively, again an Envirovent Heatsava SR-MVHR could be installed. This would require a new exit hole directly through the bathroom wall. This unit offers many advantages, such as automatically regulating humidity levels addressing other sources of moisture such as indoor laundry drying, as well as reducing heat loss.

s. Voids
This un-louvred vent cover, fitted to the redundant chimney, serves no purpose. The disused gas-cowls above are now closed off to prevent uncontrolled air-ingress. However, the vent should either be sealed up or preferably removed. Note, the age and style of this vent cover are indicative of post-war products made from asbestos. In-situ, it is of low risk. However, being damaged is to be avoided. If removed, advice from a specialist must be received.

t. Interior doors
As the property has aged since the last refurbishment much of the functionality is beginning to fail. Poor functioning door furniture combined with ill-fitting doors is allowing moisture-laden air to convect around the apartment.

u. Windows
The functionality of some of the windows is also beginning to deteriorate, leading to uncontrolled air-ingress. This example is common. The Cockspur window handle is missing a frame striker. Cockspur wedges are affordable to replace.


v. Thermal envelope
This end terrace has a large external area, built from brick and faces the prevailing wind. The two top floors form a maisonette, part of a property conversion in the mid to late twentieth century.
2. Overview of moisture management
Currently, moisture management is good, with opportunities for improvement.
Expand OverviewPeople
Observation alone can inform how we approach cooking, showering and laundry as well as knowing when and how to operate our heating, windows, and doors. A simple audit of these activities can often be enough to note how much moisture is produced, how it can be reduced and identify cues which require us to respond with appropriate actions to lessen the effects. We can then choose to put in place appropriate and intuitive strategies.
When using the kettle, observe how much excess water has been boiled and how much less moisture is produced when measuring and boiling just what we need. When cooking, observe how much moisture is being produced, the amount of water boiled off from each pan as well as from the combustion of gas. By using the hob less, the oven more or simply cooking a little slower we can kerb the rapid generation of moisture that then disperses around the home. The aroma of cooking migrating around the house should be a cue for door closing.
How often are showers taken and how long do they last, we often discover they are longer than we thought and as occupancy grows this can begin to add up. Shorter showers produce less moisture, being mindful of opening the window and closing the door after showering can make a significant difference, more so than being reliant on an extractor.
The heating can be programmed to warm the interior fabric before showering in the morning and again prior to cooking on an evening. When the weather is clement plan to get laundry outside, if dried inside it should be allowed to dry slowly on a clothes horse, equalising its moisture content with the room. Forcing moisture out using a radiator should be avoided, if this is difficult to schedule a tumble dryer should be used.
Ventilation should be controllable and the occupants should be mindful of how and when to control it. During the summer months, it is good practice to open windows and allow cross ventilation. During spring and autumn, diurnal temperature fluctuation requires good practice to open windows during warm days but ensure closed on cold nights. Operating windows and doors can facilitate a beneficial through-draught or prevent the convection of warm air.
Observing our homes and becoming familiar with how they work leads us to make informed choices as to how best operate them and with time becomes intuitive. With a strategy in place, a planned response, it becomes easier to implement our intentions.
Internal weather
As with so much of the UK housing stock this property is draughty, however, simple improvements can be made at low cost. The slow but steady passage of cold air through the property is reducing the surface temperature at specific parts of the interior. Meanwhile, when moisture vapour is produced it migrates unimpeded around the home, carried by internal convection currents.
The warm moist air is pulled toward cold surfaces to replace the air that falls away as it is cooled and becomes heavier. As the air is cooled, its capacity to hold onto moisture vapour is reduced and vapour is deposited as condensation. Moisture is conveyed from source to symptom.
By reducing uncontrolled air ingress/egress the apartment will be easier and more affordable to heat and reduce the risk of cold surfaces. By closing internal doors the convection of warm moist air to these cold surfaces is slowed and by improving the functionality of the window they can be better operated to control air movement.
Draught-proofing internal doors, as well as the external envelope, will further reduce the unwanted steady supply of cold air as well as further limiting the convection of warm moist air. It will also make it more important for the occupants to implement controlled ventilation, functional windows and doors are required. Installing sash locks would make it possible to leave the windows locked open for ventilation and fitting polycarbonate secondary glazing would stop cold air ingress when the weather is cold. Replacing door latches, refitting door jambs and adding a vinyl draught strip will not only aid in managing moisture, but they will also improve thermal comfort and reduce energy bills.
Choosing to undertake these simple maintenance and improvements restores functionality to the home, it is also ‘buying in’ and will inform how and when to operate them for the benefit of the property and the comfort of the occupants.
Thermal envelope
Improvements to the thermal envelope do not need to be extensive to make a difference. Once simple improvements have been made to windows and doors, vents and voids, we then might consider the fabric of the property. At some point in the future, a room by room refurbishment may facilitate more extensive works.
In colder areas, such as the attic bedroom, installing insulation would be beneficial but also costly and invasive. If the room is not in primary use a more cost-effective and pragmatic approach would be to isolate the room from the rest of the house with a well-sealed door and heat only on brief occasions when used to accommodate a guest. This strategy could also apply to the basement, where wall insulation would very beneficial but also lower cost.
For other rooms, internal wall insulation could be considered, both to reduce heat loss and improve response times when heating. This could be applied extensively by removing all of the existing plaster and replacing it with hygroscopic and insulative materials. Or more pragmatically by simply removing localised areas (for example the Smögåsbord of inappropriate ‘damp-proofing’ or lining such as the cement render in the dining room and dry-lining in the sitting room) and applying something more appropriate to the area that has suffered decorative deterioration.
Any future alterations, maintenance or simply redecoration will provide opportunities to improve insulation and increase the moisture buffering capacity by using vapour permeable and hygroscopic materials. Care must be taken in the specification and installation of naturally hygroscopic materials to ensure they can sufficiently diffuse moisture vapour.
Simply repairing with Lime plaster ensure it is predominately air lime and contains calcitic aggregate (hygroscopic) – such as Baumit RK38 and Kalkin-Glätt.
Many natural materials can help this process including wood fibre insulation, insulating hemp plasters and cast hemp & lime Bio-aggregate. Care must be taken not to apply synthetic vapour closed paints to these materials, vapour permeable and hygroscopic paints should be used such as Earthborn and in conjunction with lining paper.
End expand
This moisture overview looks at the relationship between people, internal weather and the traditional thermal envelope.
3. The potential solutions to mitigate the symptoms
Short-term
- Observation of live symptoms has begun. Further observation following temporary intervention for diagnostics, not repair, to continue.
- Removal of boxing in bedroom two. Remove moist detritus stop air-ingress and observe water-ingress has stopped.
- Address poorly fitting loft insulation.
Medium-term
- Install new kitchen and bathroom extractors with Single Room – Mechanical Ventilation Heat Recovery, SR-MVHR.
- Deduce uncontrolled air-ingress and restore functionality to windows and internal doors, refitting door jambs and supplementing with a vinyl draught-proofing strip. This should also be applied to the loft hatch.
- Removal of cowls and repair of Flaunching on the rear chimney. Valley should also be prevented from holding water.
Long-term
- Wall insulation.
- Where walls require extensive removal of the existing Smörgåsbord, add hygrothermal insulating plaster or preferably cast Bio-aggregate internal wall insulation system.
Summary
Appendix 1
Continued observation – investigation ongoing.
Proposed programme of works for the section boxed in below the chimney in Bedroom 2.
Phase 1.
- Remove furniture from Bedroom 2.
- Prepare site, floor protection and sealing doorway to prevent dust migration.
- Remove plasterboard from the boxing on both the underside and face of the redundant chimney. The timber frame can remain.
- Remove detritus and clean with a vacuum. All waste to be bagged, plasterboard, metal and general waste to be separated. Waste collection or transfer method and budget to be agreed and allocated.
- With the underside and inside of the chimneys exposed it should be possible to confirm the route of ingress down the inside of the chimney. This is suspected to be at the juncture the cowls intersect with the Flaunching.
- A ‘temporary repair’ should be used to confirm the diagnosis. The obsolete cowls should be removed and the Flaunching sealed over with a heat applied bitumen tape to either eliminate or determine this as the point of ingress.
- The area inside must be allowed to dry before re-boarding. Exposer to warm, dry, moving air for a number of days should be sufficient. Reboard with plasterboard and plasterboard screws to facilitate demounting the assemble at a later date. Reinstate room. Wait for a repeat of persistent and heavy rain to observe no further water-ingress has occurred.
Further inspection required for confirmation and to assess the suitability of Phase 2.
Phase 2.
Stop air-ingress using mineral fibre insulation
- Remove furniture from Bedroom 2.
- Prepare site, floor protection and sealing doorway to prevent dust migration.
- Demount newly fitted plasterboard from the face of the boxing, the underside can remain intact.
- Inspect for water ingress inside chimneys and on the underside of valleys.
- Using mineral wool insulation plug gaps from the attic into the boxing to prevent air ingress.
- Fill the remaining void with mineral wool insulation ensuring a consistent backing to the plasterboard to prevent cold spots that can attract condensation.
- Re-secure plasterboard to face using plasterboard screws. Apply a multi-finish gypsum plaster, do not apply PVA sealer to the plasterboard as this inhibits defusion of moisture from condensation. Apply a breathable ‘trade’ matt emulsion.
Phase 3.
- The removal of cowls and the application of heat applied bitumen tape over the existing Flaunching could be categorised as a ‘temporary’ as opposed to permanent repair. Although such repair product has a good life expectancy at some point in the future degradation could result in failure. A more permanent solution would be to replace the Flaunching. Water ingress is not uncommon through uncapped chimney pots, however, in this instance, it is considered that the removal of the chimney breast has reduced the capacity to defuse moisture due to the limited distance water has to travel before reaching the chimney stops and the plasterboard boxing begins.
Appendix 2.
Pending – other works to the apartment to be programmed.
Appendix 3.
Photos
Wednesday 23rd January 2019 – Flickr

Sunday 10th February 2019 – Flickr

Comments

Great contrast can be seen where heat from the radiator meets the ceiling. The ceiling has a number of cold spots due to poor fitting loft insulation.


This boxed-in section would suggest that when the chimney breast was removed in the back bedroom the chimney above was supported with the addition of a steel beam.
Could cold air be entering down the redundant chimney, creating this colds spot? Could the right internal, external circumstances cause condensation to ‘drip’ from this location? Further investigation is planned.


The cylinder in the airing cupboard connected to a header tank in the attic. Excessive air ingress/egress occurs where the plumbing meets the ceiling. This pipe would also appear hot. Perhaps the cylinder is exporting hot water to the header tank in the attic.
With respect for bygone days.


Cold spots indicating poorly fitted insulation above the bathroom ceiling leading to mould growth.

In the attic above, the insulation is poorly fitted.

Heat from the bathroom below is evident.

Further areas uninsulated.

Heat from Bedroom 1.


More heat lose visible where the inappropriate installation of a vent now creates condensation.


